HP Laptop Stuck On HP Screen (Try This Fix First!)
Disclosure: Tech Parasol is supported by its readers. When you purchase through links on our site, we may earn an affiliate commission. Thank you.
For some reason many HP Laptops get stuck on the HP logo screen.
It’s a weird one, but there are solutions to it.
So what we’ll do is start with some quick and easy fixes.
If they don’t work for you, don’t worry, there’s plenty more things you can try.
Just start from the top and work your way down the article, until your issue is resolved.
Let’s get to it.
HP Laptop Stuck On HP Screen
If your HP Laptop is stuck on the HP screen, turn the laptop off. Next, disconnect all devices. Then turn the laptop back on. If that doesn’t work, turn off the laptop once more. Then press and hold the Power button for about 30 seconds and turn it back on again.

Remove all devices
Before we move on to some more involved solutions, we need to try something really simple.
Sometimes, devices and peripherals can cause the laptop to hang at the logo stage.
The reason for this is that the laptop may attempt to boot off of these devices and will fail to do so.
So, shut down the laptop and remove all devices.
In particular, check to see if there are any CDs, USB’s, flash drives or SD cards connected.
Then turn on the laptop again.
This may fix the problem.
One user on a forum reported that his cousin had inserted an SD card into the laptop whilst turned off.
This turned out to be the cause of his laptop being stuck on the HP loading screen.
If that didn’t work for you, move on to the hard power reset.
Hard Power Reset
Resetting the computer sounds obvious, but this is actually a hard reset.
Turn off the laptop and unplug the power adapter.
Disconnect any peripherals including keyboards, mice, docking stations, external monitors etc.
If your laptop has a removable battery, remove that too.
Now, press and hold the Power button for a full 30 seconds.
This will drain any remaining power stored in the laptop’s capacitors.
At this point, replace the battery if you’ve managed to remove it and plug the laptop back in.
Finally, turn it on and it should boot in Windows and move beyond the logo screen.
If a power reset doesn’t solve the issue for you, move on to the next step.
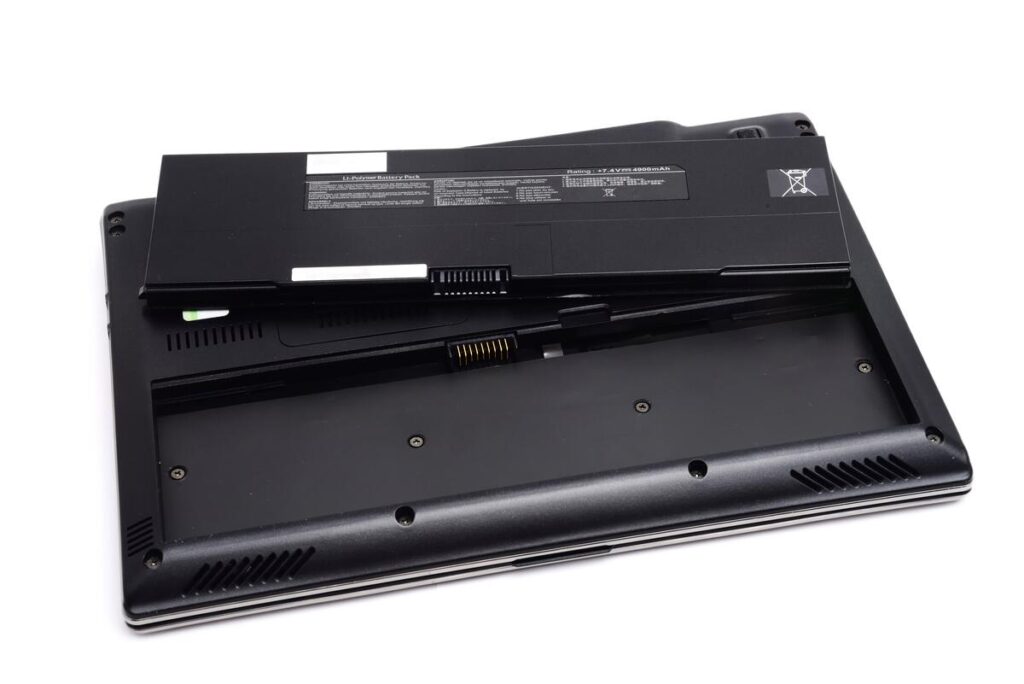
Remove the battery
If removing all your devices didn’t solve your issue, you can try removing the battery completely.
Luckily, HP laptops often have removable batteries.
But many laptops have batteries that are fully integrated and glued into place.
They often need a specialist to remove and replace them.
If this is the case with your laptop, move onto the next step.
But before attempting to remove any batteries:
- Turn off the laptop.
- Unplug the power cord.
- Remove any peripheral devices.
If the battery is removable, first look for a battery release latch on the back of the laptop.
If your laptop doesn’t have one of these, you’ll have to:
- Unscrew the back panel
- Remove the screws holding the battery in place
- Remove the ribbon cable that connects the battery to the system.
If you’re unsure where the battery is, it will be near the charging port.
With the battery removed, and the power cord unplugged, plug the laptop in and turn it back on.
Sometimes, but not always, this will instantly fix the issue and continue to boot into Windows.
If this is the case, you need to buy a new battery.
Most batteries aren’t hugely expensive.
But you do need to make sure that you get the right battery that will work with your laptop.
You have two options here.
Either you can:
- Buy a battery based on the laptop model.
- Buy a battery by looking at the actual battery.
Finding your laptop model
The easiest way to find out the laptop model is on the laptop itself.
Usually there will be a sticker somewhere or it may be printed on the laptop case itself.
In my case, when I had a HP Envy, the make and model info was printed underneath the battery itself.
So I had to remove the battery to see it.
Finding the battery model
You can usually find the details about the battery printed on the battery itself.
Once you know this information, you can then find a battery online.
Or you can ask for one in store with the same specifications.
Or, you can go to the HP Parts Store and enter the part, product or serial number.
You can also use the ‘Parts Guider’ to help you find a replacement part.
If you’ve removed the battery and it still hangs at the HP logo, then let’s move on.
We can try resetting the graphics driver.
Reset your graphics driver
Another quick fix you can try is resetting the graphics driver.
You can do this by pressing the Windows Logo key + Ctrl + Shift + B at the logo screen.
This shortcut will prompt Windows into restarting the graphics driver.
If this doesn’t work for you, it’s time to perform some HP hardware diagnostics tests.
HP hardware diagnostics tests
There are two tests you can run on a HP laptop: a Fast Test and an Extensive Test.
The fast test takes about 4 minutes. The extensive test takes at least 2 hours.
Let’s try the fast test first:
Fast test
- Hold the power button down for at least 5 seconds to turn off the computer.
- Turn on the computer and press the escape (esc) key repeatedly until a menu appears.
- When the menu appears, press F2 for ‘System Diagnostics’.
- On the HP PC Hardware Diagnostics (UEFI) main menu, click System Tests.
- Click ‘Fast Test’ and ‘Run Once’.
The above will run the test for a ‘1st pass’.
If there are no test failures, click ‘Continue’, then ‘Run once’ again to run the ‘2nd pass’ of the System Fast Test.
If you have a component failure, you will be provided with a ‘failure ID’ which is a 24-digit code.
You will need this when contacting HP Customer Support.
If there are still no failures detected, you can run the ‘Extensive Test’.
Extensive Test
The ‘extensive test’ takes at least 2 hours and you won’t be able to use the computer during this time.
To run this test, perform the following:
- Hold the power button down for at least 5 seconds to turn off the computer.
- Turn on the computer and press the escape (esc) key repeatedly until a menu appears.
- When the menu appears, press F2 for ‘System Diagnostics’.
- On the HP PC Hardware Diagnostics (UEFI) main menu, click ‘System Tests’ and then ‘Extensive Test’.
- Click either ‘Run Once’ or ‘Loop until error’.
Again, if you have a component failure, you will be provided with a ‘failure ID’ which is a 24-digit code.
You will need this when contacting HP Customer Support.
Check out the video below which also outlines these steps.
Reseating the memory (RAM)
If after running the tests it says that the memory tests have failed, you may need to reseat the memory sticks.
To do this, you’ll need to go inside your laptop.
Usually, there will be some screws on the back of the laptop around the edges.
Sometimes there will be screws underneath the rubber feet.
Once inside the laptop, look for one or two sticks of RAM and make sure they’re flush and securely in place.
Here’s what they look like:
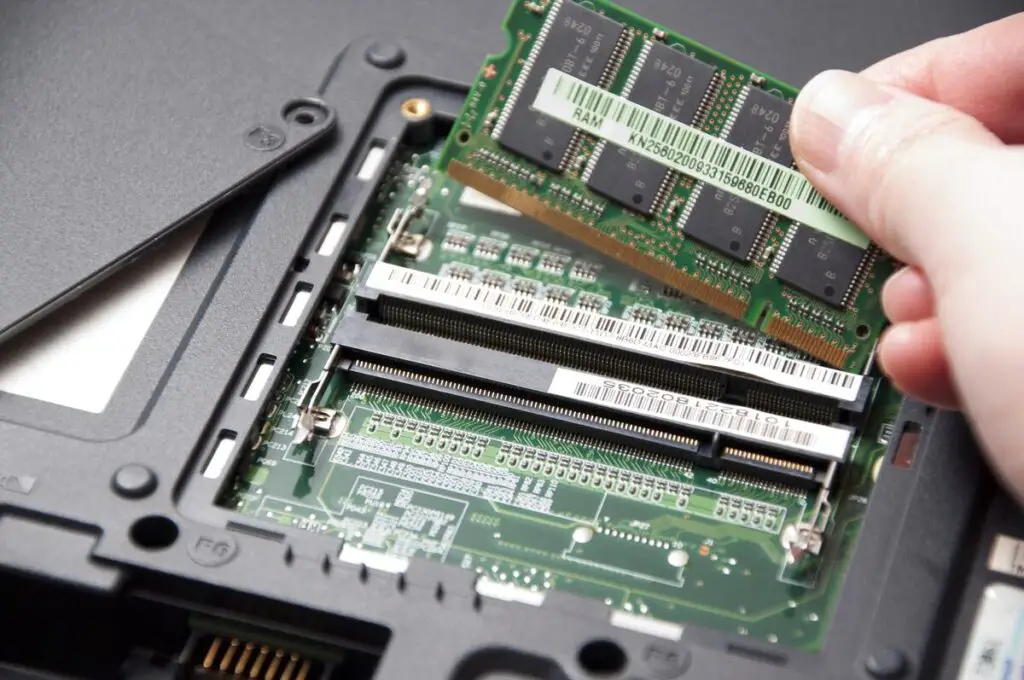
If you can’t tell whether they’re seated correctly or not, take them out by pulling the arms away to release the RAM.
You can then take each RAM stick out and put them back securely.
Then, put the case back on the laptop and try to boot the laptop again.
If you still have the same issue, try to eliminate the possibility of a bad memory stick.
You can do this by removing one memory stick at a time and seeing if the laptop boots up.
If the RAM seems to be working okay, we can try to reseat the hard drive.
Reseating the hard drive
If you get a hard drive error after running the test, try removing and reseating the hard drive.
You may have to remove the battery to access the hard drive.
The hard drive is usually located in a hard drive ‘caddy’ or holder.
This is either made out of plastic or metal.
The hard drive is usually screwed into this caddy to hold it securely.
Like reseating the RAM, take the hard drive out and plug it back in making sure that it’s securely fastened in.
Then, restart the laptop to see if the issue is resolved.
Check the BIOS system date and time
The next thing you can check is that the system date and time in the BIOS is correct.
To enter the BIOS:
- Turn off the laptop and wait 5 seconds.
- Turn on the laptop and press the escape key repeatedly until a menu appears.
- Press F10 key to enter the BIOS or whatever menu option applies to enter the BIOS Setup.
Once you’re in the BIOS, you need to check the system date and time.
Usually this is in the Advanced tab, although it may differ on your laptop.
Just keep flicking through the menus until you see Set System Date and Time.
When you see the ‘date and time’, hit enter and check to see if it’s correct.
If it turns out to be incorrect every time you restart the laptop, the CMOS battery may need replacing.
The CMOS battery is usually a 3-Volt (3V) CR2032 Lithium coin battery.
These are widely available in most stores and online including Amazon.
To replace the battery, unscrew the back of the laptop and look for the CMOS battery.
It’s about the size of a small coin.
Once replaced, set the system and date and time correctly and see if the laptop boots into Windows.
If the solution still persists, move onto the next potential solution.
Restore the BIOS
The next thing we can try is restoring the BIOS.
The BIOS stands for Basic Input Output System.
It’s baked into a small memory chip (ROM) on the motherboard.
It’s the first software to run when you start up your computer.
If the BIOS is corrupt in any way, it can prevent the computer from starting up properly.
Luckily with HP laptops, they have the ability to restore the BIOS from the hard drive.
Follow these instructions exactly to restore the BIOS:
- Turn off the computer and plug the laptop into a power outlet.
- With the computer powered off, press and hold the Windows key and the B key at the same time.
- Whilst still holding the Windows key and the B key, press and hold the Power button for 1 to 3 seconds. Then release the power button.
- Continue holding the Windows key and B key until you hear the laptop beep or until the HP BIOS update screen opens.
At this point your laptop screen may be blank for between 30 and 60 seconds.
Things to note
- If the HP BIOS update screen does not open, repeat the process again.
- If the HP BIOS update screen still doesn’t show up, repeat the process again, but instead use the Windows key and the V key.
- If the HP BIOS update screen still doesn’t display, then your laptop may not support this feature. Or there may be a hardware issue.
- If the power light turned off, the power button was held for too long. Make sure to only hold the power button for between 1 and 3 seconds. No longer than that.
Once the BIOS update screen appears, the BIOS recovery process will start automatically.
Restore the Operating System
If restoring the BIOS didn’t work, then at this point it’s likely that you have a corrupt Operating System.
In which case, we have a few options.
- Startup Repair.
- System Restore
- Full Factory Reset.
You should try the ‘Startup Repair’ option first. If that doesn’t work, try the ‘System Restore’ option.
If both of these fail to fix the issue, you can do a ‘Full Factory Reset’.
But bear in mind that a ‘full factory reset’ is the last resort as it will erase all your data.
So, let’s try the ‘startup repair’ option.
Startup Repair
To perform a ‘Startup Repair’, do the following:
- Turn off the computer and plug the laptop into a power outlet.
- Turn on the computer and repeatedly press the F11 key.
- On the Windows ‘Choose an option’ screen, click ‘Troubleshoot’.
- Click on ‘Advanced Options’.
- Click on Startup Repair.
Once you’ve clicked on ‘Startup Repair’, follow the instructions on screen.
You may have to select your user account if you have more than one.
Just select the appropriate one.
Then Windows will try to repair itself automatically.
If that doesn’t work for you, we can try a ‘System Restore’.
This will restore Windows back to its last known good configuration that worked.
System Restore
To perform a ‘System Restore’, do the following:
- Turn off the computer and plug the laptop into a power outlet.
- Turn on the computer and repeatedly press the F11 key.
- On the Windows ‘Choose an option’ screen, click ‘Troubleshoot’.
- Click on ‘Advanced Options’.
- Click on ‘System Restore’.
Once you’ve clicked on ‘System Restore’, follow the instructions on screen.
This will restore Windows to a previous restore point.
Factory reset
If you’ve tried everything in this article so far then the last option is to try a ‘Factory Reset’.
Warning: This will erase all your files and data.
To perform a factory reset, do the following:
- Turn off the computer and plug the laptop into a power outlet.
- Turn on the computer and repeatedly press the F11 key.
- On the Windows ‘Choose an option’ screen, click ‘Troubleshoot’.
- Click on ‘Reset this PC’.
- Click on ‘Remove everything’.
- Click on ‘Fully clean the drive’.
Follow the on-screen instructions carefully. Also, keep in mind that this can take several hours.
HP Support
As a last ditch effort, you can always try contacting the HP support center.
The phone number for the HP support team is 1800-474-6836 in the USA.
This was given to me by HP support over on Twitter.
Conclusion
HP laptops can occasionally get stuck at the point where it shows the HP logo and won’t boot into Windows.
If you’re having problems getting your HP laptop to move beyond the HP logo, then try these fixes in order:
- Remove all devices. This includes any SD cards, keyboards, mice, external monitors, docking stations etc.
- Perform a hard reset.
- Remove the battery and boot the laptop using the adapter only.
- Reset your graphics driver.
- Run the HP hardware diagnostics tests. Reseat memory (RAM) and/or hard drive if necessary.
- Check the BIOS system date and time and replace the CMOS battery if necessary.
- Restore the BIOS to a last known working version.
- Perform a Startup Repair.
- Perform a System Restore.
- Perform a Factory Reset.
- Contact HP support.
If any of these solutions fixed the issue for you or if you’ve found a different solution, I’d love to know about it.
Feel free to send me an email about it. That way I can include it in the article and help others.
Before you leave my site, you might want to check out my article on whether I think HP laptops are good (or not).
Sources
Contact Official HP® Support – United States

Robert Anderson
Robert Anderson, the founder of Tech Parasol, had a keen interest in tech from a very young age. He studied Electronic Engineering at University and then went on to become a Software Developer. He launched Tech Parasol in 2021 to share his knowledge with the aim of making tech easier to understand for everyone.
